I like to bake bread. Because of The Husband’s histamine intolerance, spelt is a better choice for us. (note: This isn’t technically a histamine-intolerance friendly recipe, because it has yeast in it. However, because his intolerance is not severe and he can eat regular yeasted bread from time to time, I bake it occasionally.) Unfortunately, a lot of spelt bread tastes like it came from the health food store (in a bad way), and it’s really expensive. So, I’ve started making our own.
It turns out that I actually really like working with spelt flour. I have discovered that here in Germany, there are many varieties of spelt flour that bake up beautifully– I love whole grain spelt flour, and there are also some varieties that are so finely ground that I use them in place of standard cake flour. In the US, my experiences with spelt four have not been as positive– the words “sandy” and “obscenely expensive” come to mind. Perhaps I didn’t look hard enough.
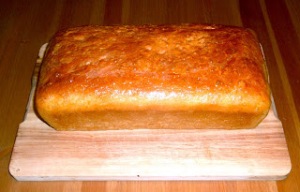
This is one of my favorite bread recipes. At its best, and even at its less-than-best, the texture and crumb of this bread are heavenly. The pillowy inside is encased in a perfectly crispy crust, made even more delicious by the light glazing of melted butter brushed over the still-warm top. I usually bake it with herbs, but sometimes I don’t. And the only reason I say that it’s almost perfect is because the dough is not the most forgiving. While it does produce a pretty perfect loaf, that’s only if you time everything really well. In order for me to consider a recipe perfect, it has to allow that I decided to run to the grocery store when I should have ended the second rise by putting it in the oven. However, If you don’t time everything just right with this dough, it will still produce a good loaf of bread that you can enjoy. It just won’t be as perfect.
The measurements below are for 2 loaf pans, or 1 giant loaf pan. I usually make a giant loaf because we use this as our every-day bread, and I but I don’t want to bake bread every day. It usually lasts us for… longer than a day, but not as long as it should. 🙂
And one little trick (that is perhaps obvious)– my favorite place to rise dough is in the oven with the light on. With the light on and the door closed, it’s just warm enough. Toward the end of the second rise, I take the dough out to preheat the oven, and leave the dough close enough to the heating oven that it doesn’t cool off too much.
(Almost) Perfect (Herbed ) Bread
makes 2 loaves
a little note– I have been making this bread modified from a recipe I have saved in the "drafts" box of my email. I have no idea what the original source was. If you want to claim it as yours, feel free. I'm not trying to rip anybody off here.
1 envelope ( 7 grams) Active Dry Yeast (Not instant)
1 3/4 Cups (400 ml) Lukewarm Water
4 Cups (512 g) All Purpose Flour
3 Tbs. (3 EL) Sugar
1 1/2 tsp. (1 1/2 TL) Salt
1 1/2 tsp. (1 1/2 TL) Italian Herb Mix or Herbes de Provence (optional)
Garnish: 2-3 tbs. (2-3 EL) Melted Butter
Directions: Add yeast to warm water in a large bowl. Stir to dissolve and wait 5 minutes.
Blend in all remaining ingredients, (except butter) and stir until smooth. Cover with a thin towel and set aide to rise or double in bulk, (about an hour and a half.) Punch Down and turn dough out into lightly floured counter or board. Knead until smooth and large bubbles have disappeared. (Don't spend too much time on this step. Just try to get out the large air bubbles by folding it over on itself a few times. It will still be airy and fluffy; this is a good thing. Also, if your dough is hard to work with, add more flour. I nearly always have to. Remember, think airy and fluffy here. If it's sticking too much or is hard to work with, add flour until it picks up off the surface easily.)
Divide Dough into 2 loaves and place in 2 lightly greased loaf pans (or leave whole and place in one large loaf pan). Cover and let rise again, covered with a towel until doubled in size (about another hour). Bake at 350 F (175 C) for 35-40 minutes. Remove from pans and brushed tops with melted butter (for heaven's sake, don't skip this. it's not that much butter and it makes a difference!).